 Improving the Terminal Velocity terrain renderer
One of the things you'll see a lot while playing the game is the terrain. When I originally started working on the levels, I made a very quick and dirty way to get the terrain on the screen, and while it certainly worked, it never felt like a nice solution. So recently I redid a large chunk of how terrains are put on to the screen, with some nice results!
Terrain data

First, let me explain how terrains are actually stored in the game. There are three relevant files: the heightmap, the texture list, and the texture index map.
The heightmap and texture index map are both 256x256 image files with one byte per terrain tile. The heightmap indicates (without much surprise) the height of the corners of each tile, and the texture index map is a byte that for a specific tile gives an index in the texture list.
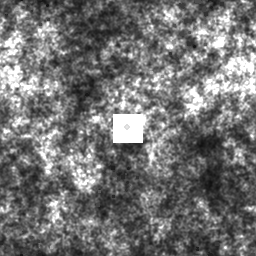
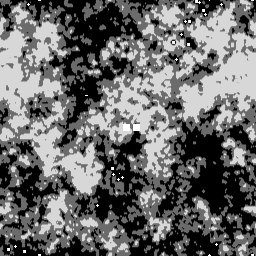
The texture list is simply a list of texture file names that are loaded and used to actually texture the tiles. How many textures are in this file can vary heavily - some levels use under 30 textures, some over 70. Put all this together, and you have a terrain!
Additional terrain things

The information above will get you the basic terrain, but it's not quite everything there is to rendering all terrain situations in the game. There are two other important aspects to know: cave rendering, and tunnel entrances and exits.
Cave rendering refers to the sections of the game where you are inside a cave. I have written about this before, but in short: the standard heightmap is inverted and positioned that maximum heights touch, and the ceiling uses texture indexes taken from an offset of that map.
I have also written about tunnels before, but for terrain rendering the important part is that tiles with tunnel entrances or exits on them need to be handled separately.
The original implementation

So what did I do originally? A very, very simple solution. I generated the correct position and normal for every tile, and used a (0, 0) to (1, 1) uv coordinate system for the two triangles making up the tile. Any tiles that had a tunnel on them would simply not get vertices and triangles.
Then, for each separate texture index I would make a separate triangle list, and using Unity's submesh method I could share the position, normal and uv list while having separate materials. Which, yes, means that for every single texture there was a separate material, and a separate draw call. Since I mentioned earlier that levels can potentially have 70+ textures, that is a lot of draw calls for something so straightforward.

On top of that, caves effectively have separate materials for each time, due to them using a different texture index. So add another set of draw calls on top of that to be able to show that. And another separate generated mesh.
And to top it all off, when you are rendering caves, the floor terrain gets slightly different normals at any vertex that is at maximum height (what I have started calling the "seam"), as there it is supposed to be averaged with the ceiling direction instead of the flat top. So I have to generate a 3rd mesh just for that - although when playing only one of the floor meshes will ever be visible.
Sure, it worked. But I did not like the solution, as it was just too... crude. So I rebuilt it.
A discarded alternative

I actually considered a different option for better rendering. This option was basically "do everything in a shader".
In this situation, the heightmap and texture index map would both be uploaded as textures, and only minimal mesh data would be uploaded - one vertex per tile, with maybe a few extra parameters. Then, a geometry shader would expand this single vertex to the two triangles that are needed, compute the correct vertex positions and compute the correct normals. A pixel shader can then use this information and index a 2d texture array that contains all the level textures.
That this would put all the computation in the GPU is something I definitely considered interesting, and while developing I considered multiple times to move to this solution. But ultimately I did not, because of a simple reason: collision meshes.
I still use Unity's standard physics and collision system, so I need to create a proper mesh for that. And this mesh creation would duplicate several aspects of the terrain mesh generation. I decided against duplication of code and went with a solution that's maybe not as "fun" as a GPU-only implementation, but still an improvement over the original!
The new solution

So what did I make in the end?
Even though not everything went to the GPU, I still moved a good chunk of processing to the GPU. As I explained before, the reasons I needed to make three different meshes are: ceiling inversion, different textures on the ceiling tiles, and the seam normal on the floor mesh. I ended up putting all of this in a single shader.
Ceiling inversion
Inverting the mesh for the ceiling is simple enough. The maximum height of the terrain is known, so to compute the ceiling version y coordinate we can easily calculcate 2*heightMax-y. The normal also needs adjusting, as the y component must be negated.
Texture references

Before I talk about how to handle the different textures used by the floor and ceiling parts, I first have to sidestep and explain how I handled the terrain textures in the new system at all. I kind of glossed over something when I described the discarded alternative: 2D texture arrays. This is a GPU structure that, as the name suggests, is an array of 2D textures. But since it is a single structure, this means that you get to pick the texture to use from it inside your shader. In other words, a perfect analog to the terrain texture list!
There is one thing about texture arrays that is relevant for this remake: every texture in the array has the same width and height. But the game uses a mix of texture sizes for its tiles. Generally 64x64 pixels, but a number of "detail" tiles will have 256x256 textures. This means the texture array will end up with the size of the largest texture for the terrain, and I'll need some way to tell how big the texture in a particular index actually is.
So I need a texture index, and a size. I put both these into one of the uv sets in the mesh. These values are kept the same between all corners. In the pixel shader I can then sample the correct index of the texture array and scale as needed.
Ceiling textures
With this setup for the floor textures, ceiling textures are now actually trivial! I'm already storing an index and scale for the floor texture - each two floats - so I just store another pair of floats with the same information for the ceiling texture. A UV value is 4 floats, so all floor and ceiling data can be stored in one set, and a single shader setting that toggles between floor and ceiling rendering will be sufficient to pick which set to use.
Seam normal
Regular normals for the terrain are simply based on partial derivatives of the heightmap at each point. But for normals at the seam between floor and ceiling this does not work, as it should be based on the fact that there are vertices above the current vertex as well. But due to the specific situation at the seam, where any adjacent vertices are mirrored, it's only needed to consider any adjacent vertices that actually exist on the seam itself.
Additionally, since these vertices are always on walls you can only effectively have two neighbouring vertices on the seam. So I find those two neighbours and compute the resulting normal.
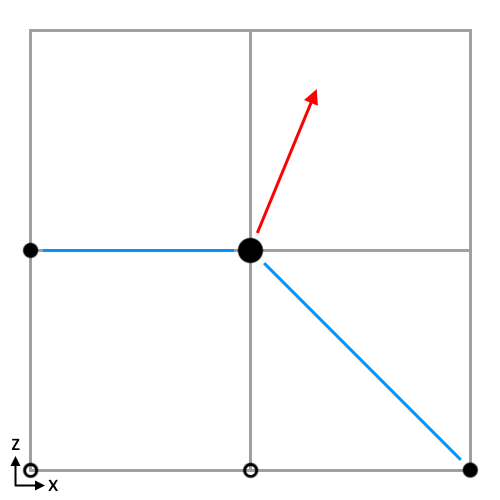
I then reduce the normal down to a single angle using the atan2 function, and store the resulting float in one of the uv sets of the mesh. The shader then turns the angle back into a normal for any vertices on a seam (which is any max height vertex in ceiling or floor-cave mode).

Now you may ask "why go through the bother of turning the vector into an angle?" After all, you can just store the normal in a uv set - you can even only store the x and z components, since y will always be zero. The reason is that with everything else that is stored in uv sets, I actually had just one component still open, and I decided to go for minimizing uv data.
You may remember that I use one full uv set for the texture references. There is also the regular uv coordinate for texturing purposes. That would give two components left to use, so what is that last float?
Tunnel presence
This is because the shader still needs to know if a tile has a tunnel entrance or exit! Because these tunnel tiles are handled completely separately, with their own game object, colliders and mesh renderer, the regular terrain renderer cannot draw anything where a tunnel exists.
This is extremely simple to handle though: When creating the mesh with all its information, any tile where a tunnel exists gets a 1 stored in the last uv component I still have left, and a 0 for where it's regular terrain. The terrain shader then simply discards any fragments that belong to tunnels. It's not the most beautiful solution, as you do end up still running a good part of the shader for tiles that end up invisible - but it's a simple solution that works for the entire terrain, and tunnel tiles in the game are quite rare, so it's not a lot of wasted work.
The last pieces
Those are all the parts needed to render the terrain in my new implementation. The shader gets a single 3-value parameter to select between relevant render variations (floor without seam, floor with seam, and ceiling), and then just renders everything out in one go.
The new implementation also improves on game objects and meshes. My old implementation needed three separate game objects each with a separate mesh and separate material arrays - one for each of the three mentioned states. The new implementation only needs two game objects (I still need to be able to toggle the ceiling), but these game objects share their mesh data and texture array.
The end result: Going from one draw call per tile texture to just... one. For the entire terrain. A nice improvement I think!